
Our website now supports authentication using the provincial VLE through the LTI protocol. Enabling this access allows users to login in a single click , either from within your VLE or by clicking a Signing with the VLE button. To enable this access, the site’s operational contact will need to configure LTI authentication. This will require help from the organisation’s District eLearning Contact (DeLC).
Configuring LTI access
The following instructions apply only to operational contacts. If you would like to reach your operational contact, you can find their contact information here.
- Connect to our website using your operational contact login.
- Once connected, navigate to your organization’s configuration.
- On the configuration page, there is a section describing LTI configuration. We need to fill in the OESS Site LTI Link for SSO field. To generate this link, first take down the values in the LTI Key and LTI Secret fields.
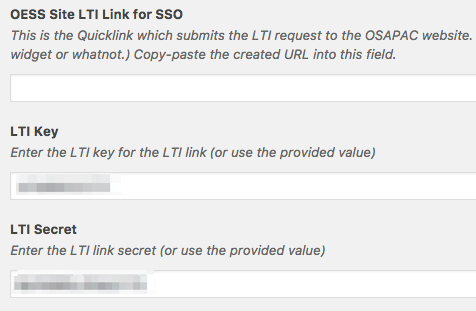
- Contact your organisation’s DeLC and ask them to follow the following instructions to generate the LTI link (below). Once you have the link, insert it into the OESS Site LTI Link for SSO field and save your configuration. While you’re at at, it might be worth updating any configuration details for your organization.
- Log out of your account and test the LTI connection by attempting to sign in with the VLE using your organization’s VLE login. You should be brought back to this page after a successful connection.


A few notes about LTI authentication
We use information transmitted in the LTI request to determine access rights to software titles. Users are mapped to teacher level access or student level access. There is no technician, or operational contact, level access through the VLE. Technicians must use your organization’s generic login information. This information is available under your organization’s site configuration page. There is one exception to this rule, for operational contacts, if your account email matches the email on your VLE account and you have admin level privileges on the VLE, you will be logged in to your operational contact account.
Creating an LTI Link for the OSAPAC Website
LTI is designed as a protocol for an LMS to communicate with an external learning tool (usually for educational purposes). However, the LTI transaction, with a few modifications, contains information which can be used to provide a single-sign-on like experience. To allow a user to access our website with a single click, you must implement two things
- Deep-linking : This is a configuration option which can be enabled with D2L. Once enabled, it allows protected links to be passed through for users who are not logged-in, once they log in. That is, if a user clicks a protected link (for example attempting to open a course), without being connected, they are presented with a login screen. Once they log in, they are brought to the course in question, and not the org homepage. Most organisations already support deep-linking, but if it is not enabled on your site, the D2L helpdesk can enable it. To see if you have deep linking enabled :
- Log in to your organisation and open any protected content (a course will do just fine).
- Copy the URL of the course.
- Log out of D2L.
- Paste de course URL in your address bar and attempt to open it.
- You should be presented with the login page for your org. What happens after you login? If you are brought to the org homepage, deep linking is not enabled. If you are brought to the course in question, deep linking is enabled.
If you are unable to support deep linking, your users will still be able to connect to our site, but only by clicking a link from within your VLE (for example a widget link).
- An accessible external tool link : Once you configure the LTI link, you must insert it into some object which all users can access. In doing so, D2L generates an instance of the LTI link which all users will be able to use. It is important to note that the object in which the link is inserted does not need to exist (you could delete a widget containing the link, for example), we only need the object for the generation of the LTI link.
Creating an LTI link
- Under the administration tools menu, select External Learning Tools
- Create a New Link.
- Enter the following information
- Title : OSAPAC Website
- URL : https://www.osapac.ca/lti
- Description : A link used to allow users to log in to the OSAPAC website to download titles.
- Visibility : Allow users to view this link should be checked.
- Key/Secret :
- Sign messages with key/secret : should be checked
- Link key/secret : should be selected
- Key : The LTI key provided by the operational contact, obtained from the OSAPAC website.
- Secret : Le LTI secret provided by the operational contact, obtained from the OSAPAC website.
- Custom Parameters : None
- Security Settings : All options may remain unchecked, or with default values, unless otherwise specified.
- Use link security settings : should be selected
- Send tool consumer information to tool provider : should be selected
- Send LTI user ID and LTI role list to tool provider : should be selected
- Send user email to tool provider : should be selected
- Send system Org Defined ID to tool provider : should be selected
- Make link available to : If you intend to allow access to this link only from the Org homepage, you may use the default value. If you wish users to be able to use the link within other org units, you may add them here.
- Save the link.
Confirming the LTI role mappings
We use standard mappings for LTI roles, however, it is worth confirming that your org is properly mapping its roles.
- Under the administration tools menu, select IMS Configuration
- The top row contains the generic roles our website will receive. The left-most column contains the roles within your org. Ensure that the following mappings are in place.
- All your student roles : Must map to Learner or Student, or both. Should not be mapped to Instructor, Staff or Administrator.
- All your teacher roles : Must map to Instructor or Staff, or both. Should not be mapped to Administrator.
- All administrator roles : Should map to Administrator. Can additionally be mapped to any other role.
For example, on the eCommunity, the _Participant role (for teachers) is mapped to Student, Learner and Instructor.

- Save the configuration

Confirming User Access Rights
Most orgs will already be configured to allow users to open external LTI links, however, it’s worth confirming that your org allows users to open LTI links.
- Under the administration tools menu, select Roles and Permissions
- Click any one of the roles you’d like to be able to access our website.
- Filter the tools to show only External Learning Tools

- Ensure that Launch External Learning Tool Links is checked for Organization, Course Template and Course Offering. This is the only right required for student roles, you may save this configuration and move to the next role.
- If you are editing a teacher role and wish to allow your teachers to create instances of this link within their courses (assuming you have given them access to the link, as discussed previously), Create External Learning Tool Links from available External Learning Tool Providers, should be checked for Course Template and Course Offering.
- Repeat this process for all roles which should be able to access our site.

Creating an instance of the OSAPAC LTI Link
Now that you have created an LTI link, we must create an instance of it (it’s as if we just wrote a recipe for an LTI link and now you must cook it to enjoy it). Once created, the resulting link should be transmitted to the local representative who supplied the LTI key and LTI secret, so that they may enter this information on the OSAPAC website and finalize the process. Any instance of the link will work, provided it’s inserted on a page all users can access. For simplicity, and to allow easy access to your users, we suggest creating the link in a widget which is visible on your org homepage.
- On the org homepage (this is important), open the administrative tools and select Homepage Management
- Select Widgets
- Create a new widget (or open an existing one, if you wish to add the link to an existing widget)
- If creating a new widget, enter a Name and a Description.
- Select Content
- We suggest you place the link on an OSAPAC logo. You can download a transparent PNG here. Insert the image into the widget.
- Highlight the image in the editor by clicking it.
- Click the link tool on the toolbar.

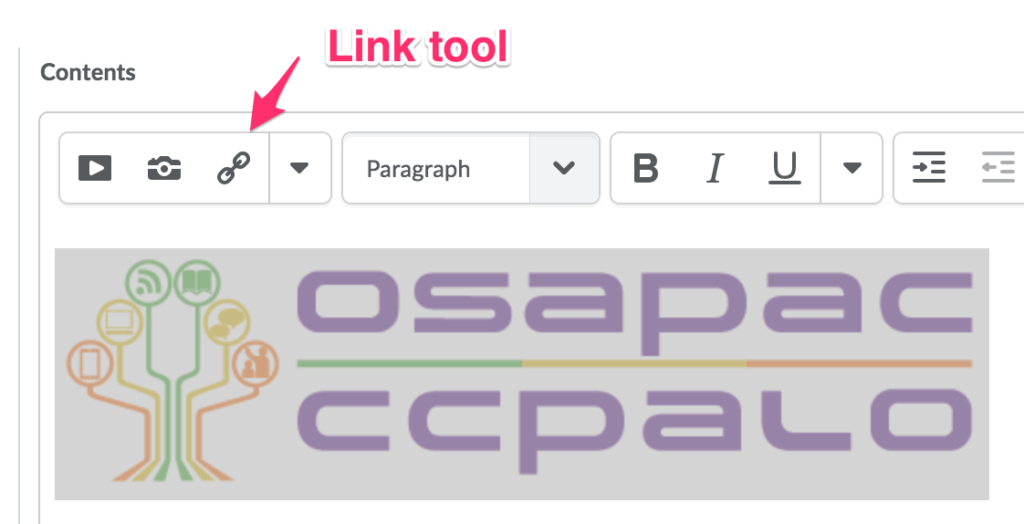
- Select External Learning Tools (you may need to scroll)
- Select the LTI link you created
- We would normally save the widget as it is, but we also need the code for the generated link. To get this code, open the HTML editor for the widget.
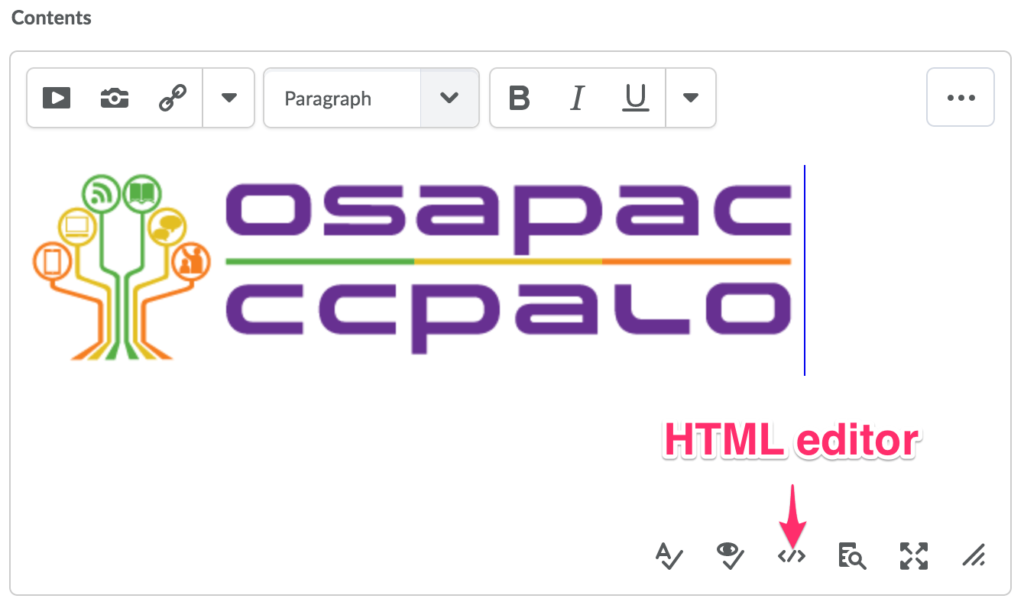
- Locate the <a> tag which surrounds your image. We need the code in the href attribute (in between the two quotes). Copy this code.

- Leave the HTML editor and save the widget, if you intend to keep it, if not, you may safely delete it.
- Paste the code somewhere (Word, Google Docs, Notepad; any one work) and apply the following modifications
- Replace {orgUnitId} with the number following srcou= (at the end of the code). For example, in this case, we’d replace {orgUnitId} with 6605.
- Prepend the base URL for your organization. This is the first part of the URL for any page in your org, before the /d2l/

The resulting URL should look like this https://community.elearningontario.ca/d2l/common/dialogs/quickLink/quickLink.d2l?ou=6605&type=lti&rcode=eLO-20092702&srcou=6605
Give this link to your local contact, so that they may insert it into their configuration on the OSAPAC website.


Testing your link
Assuming you inserted the link into a widget on your homepage, you should be able to click it and be brought to the OSAPAC website. This test can be done before the local contact adds the link to their configuration on the OSAPAC website. Contact us if you experience any problems.